
In this post i am going to share "How to add Cool Responsive Sitemap Widget for blogger blogs" . Flowing the below instructions .

After Adding the above code. Replace http://www.computerjajot.com with your blog link
Then Click on the options on the right sidebar and select Don't allow, hide existing for Reader comments
Now, Click publish and See the page.
That's all, We are done.
I Hope you all like this widget Kindly Let me know your thoughts about the widget and don't forget to share it...
Happy Blogging :)
Malin Sarkar
09:40:00
New Google SEO
Bandung, Indonesia
How To Add Sitemap Widget to your blog
- In the blogger Dashboard, Select your blog
- Go to Pages >> New Page, then choose HTML Part
- Paste the following code inside it.
<script src="https://googledrive.com/host/0B-P4_Fs3S76ydURacVd6TlJyWW8" type='text/javascript'></script>
<script src="http://www.computerjajot.com/feeds/posts/default?max-results=9999&alt=json-in-script&callback=loadtoc"></script>
<style type="text/css">
.post-archive { width: 100%; padding: 20px 0; text-transform: capitalize; }
.post-archive h4 { border-bottom: 2px solid #EEEEEE; color: #333333; font-size: 20px; margin: 0 0 10px 2px; padding: 0 0 10px; }
.ct-columns-3 { -moz-column-count: 3; -moz-column-gap: 10px; -moz-column-rule: none; -webkit-column-count: 3; -webkit-column-gap: 10px; -webkit-column-rule: none; column-count: 3; column-gap: 10px; column-rule: none;}
.ct-columns-3 p { padding: 5px 0px; -moz-column-break-inside: avoid; -webkit-column-break-inside: avoid; -o-column-break-inside: avoid; -ms-column-break-inside: avoid; column-break-inside: avoid; display: inline-block; width: 100%; }
.ct-columns-3 p a { background: #fafafa; color: #333; display: block; border: 1px solid #FFFFFF; font-size: 14px; line-height: normal; outline: 1px solid #EEEEEE; padding: 10px 15px; -webkit-transition:all .25s ease-in-out; -moz-transition:all .25s ease-in-out; -o-transition:all .25s ease-in-out; transition:all .25s ease-in-out; }
.ct-columns-3 p a:hover { background: #555; color: #fff; }
@media screen and (max-width: 768px){ .ct-columns-3 { -moz-column-count: 1; -moz-column-gap: 0px; -moz-column-rule: none; -webkit-column-count: 1; -webkit-column-gap: 0px; -webkit-column-rule: none; column-count: 1; column-gap: 0px; column-rule: none; } }
</style>
After Adding the above code. Replace http://www.computerjajot.com with your blog link
Then Click on the options on the right sidebar and select Don't allow, hide existing for Reader comments
Now, Click publish and See the page.
That's all, We are done.
I Hope you all like this widget Kindly Let me know your thoughts about the widget and don't forget to share it...
Happy Blogging :)

Friends,
Today i am going to share a small trikes for new blogger. If you are using a template by Blogger Template Designer, All of them have an attribution at the bottom of the blog. by default, Blogger templates include attribution gadget at the bottom of each template. The Attribution gadget is the gadget in the footer that says "Powered By Blogger". We have tried to remove this "Powered By Blogger" widget then we may noticed that gadget is locked. But i have a little solution removing this "Powered By Blogger". Follow my instructions below if you wish to remove or customize blogger attribution widget.

Steps 1 :
Important Notice : Always Back Up Your Templates before Making Any Changes On it.
Otherwise don't work properly the above process then try the below process.
Step 2:

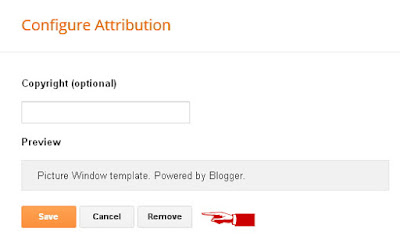
Malin Sarkar
00:32:00
New Google SEO
Bandung, IndonesiaToday i am going to share a small trikes for new blogger. If you are using a template by Blogger Template Designer, All of them have an attribution at the bottom of the blog. by default, Blogger templates include attribution gadget at the bottom of each template. The Attribution gadget is the gadget in the footer that says "Powered By Blogger". We have tried to remove this "Powered By Blogger" widget then we may noticed that gadget is locked. But i have a little solution removing this "Powered By Blogger". Follow my instructions below if you wish to remove or customize blogger attribution widget.
Steps 1 :
Important Notice : Always Back Up Your Templates before Making Any Changes On it.
- Log in Blogger Account
- Go to Design > Edit HTML
- Expand your Widget Template.
- Click Ctrl+F for the browser Find bar to pop up.
- Search </head> code in your template.
<style>Finally Save your template.
#Attribution1 {
display: none;
}
</style>
Otherwise don't work properly the above process then try the below process.
Step 2:
- Go to Design > Edit HTML
- Expand your Widget Template.
- Click Ctrl+F for the browser Find bar to pop up
- Search for the code below in your template.
<b:widget id='Attribution1' locked='true' title='' type='Attribution'>
- Now change the locked value 'true' to 'false' in the line of code.
<b:widget id='Attribution1' locked='false' title='' type='Attribution'>
- Now find the code similar below,
<b:section class='foot' id='footer-3' showaddelement='no'>
- Now change attribute value showaddelement no to yes as below,
<b:section class='foot' id='footer-3' showaddelement='yes'>
- Save your template.
- Go back and navigate to Layout tab.
- Find Attribution element bottom of your page.

- Click on Edit
- Now click on Remove button.

Finally click on Remove option. And enjoy .... Happy journey for blogging
Picture Credit: things-guide.blogspot.com


